Aluminum Finish
Below are a series of guitar effects that are finished without paint or with paint in selective spots. All the boxes are Hammond 1590BB. You'll notice that once sanded the aluminum looks very different from itís original mottled, dark gray diecast appearance. After years of use, the boxes show minimal wear (actually, none) compared to painted boxes of the same age. Also noteworthy is the short amount of time needed to prepare these as compared to actually painting them. You can easily start and finish a box with a half hour, and use it a few hours later after the lacquer dries. If you try this, make sure to wear a quality DUST MASK or RESPIRATOR. Inhaling aluminum dust is not good for your lungs. You should also wear SAFETY GOGGLES. Proceed at YOUR OWN RISK.
Each enclosure was completed with the same basic method. They were sanded, cleaned, and clear coated with high gloss lacquer. Most of the sanding was performed with a handheld vibrating sander fitted with 100 or 120-grit paper. To really speed things up, follow this method: Use a metal bristle drill attachment (the kind that is shaped like a disk). Use a drill at high speed, applying moderate pressure until the metal is shiny. Then use 100-grit sandpaper and sand until the sheen is worn off. Last, drop down to 120-grit paper for the final sanding. Make small circular motions with the vibrating sander. This creates an unpredictable and pleasing looking pattern in the metal. Finally, bevel the edges by running the vibrating sander along the length of the edges at a 45-degree angle. Once all the sanding is done, the surface of the metal should be cleaned with a solvent and dusted. Nail polish remover works very well for cleaning bare aluminum. Since nail polish remover can remove the paint, JD Sleep recommends lighter fluid for cleaning the boxes if part of the surface is painted. Do NOT use rubbing alcohol to clean the aluminum, as was early suggested on this page, as this agent interacts with, and thus clouds, the lacquer. Once cleaned and dusted, a high gloss lacquer may be applied to coat the entire outside surface. High gloss lacquer adds more depth to the metal than semi (Try Behlen Master Jet Spray Clear Gloss (B101-0801)). Since the surface doesn't have the little bumps and pits that paint can have, there are no imperfections to exaggerate. The finish looks smooth and even.ÝÝ If you wish, you can apply label material to the metal before applying the lacquer. This works extremely well.
 |
 |
|
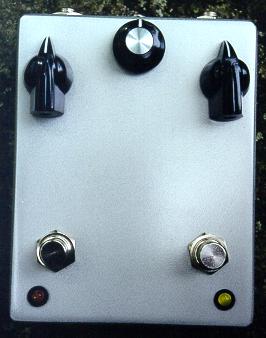
Left: Similar method. The bottom left LED is actually
clear.
|
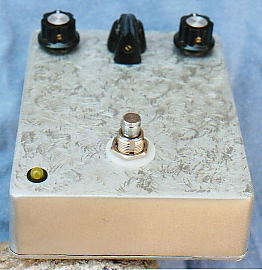
Right: This effect was made with the process described
above. The picture doesn't do justice to the texture, which approaches
a sand blasted look.
|
For this box, 100-grit sandpaper was stapled to a small piece of plywood. A thin strip of wood was clamped on one side of the plywood (over the sandpaper), which was used as a guide to run the box along. The box was sanded by running it back an forth against the guide. The top was sanded first, then the sides. The look is sort of like stainless steel.
 |
 |
Next is a series of pedals that has only the top surface painted. To achieve those nice sharp edges, they were first rough-beveled. The box was then primed, painted, and baked (do not bake too long or above 175 with textured paint) on the top surface, with the edges and sides taped. Next, the tape was peeled off and the sides and edges were sanded further. Finally the whole thing was cleaned and clear coated with lacquer. If you try this, see if you can avoid using more than 1 or two thin coats of primer, as there was a thin gray line visible at the edge of the paint with my first attempt. This line was less visible on next effect.
 |
 |
 |
 |
Last. For kicks, whip out the dremel with some grinding disks after you have sanded the surface.ÝÝ Apply the dremel to the surface of the metal in short, gentle strokes.Ý Experiment with different grinding bits and different motions. This creates very cool patterns and adds considerable depth to the metal. BE SURE TO WEAR GOGGLES for this process.Ý When done, follow the same finishing steps as described above. As a side note, the trick to achieving great results with label material is applying TWO coats of softener, one during the label application, and another once the labels have dried. Especially rub softener on the edges of the labels, for instance with a q-tip, while being cautious not actually rip the edge.
 |
|
 |
|
 |
|

Last Updated July 8, 2002